Grout, primarily found in kitchens on backsplashes, countertops, and tile floors, significantly contributes to the overall cleanliness of your home. Given its porous nature, grout readily absorbs dirt, grease, and liquids, making it a challenge to maintain. Applying effective grout cleaning techniques is essential for a sparkling clean kitchen.
Kitchen grout maintenance often begins with understanding the types of grout in your home and selecting the right cleaning methods. For a quick grout cleanup, various approaches have been evaluated. For instance, using Magic Erasers takes less than a minute but scores only 2/5, while a mixture of Hydrogen Peroxide and Baking Soda requires 2 minutes and scores 3/5. The method combining Vinegar, Baking Soda, and Lemon Juice takes around 2.5 minutes, achieving a 4/5 rating, indicating its effectiveness and affordability.
For professional-grade results, products like Zep Grout Cleaner & Brightener, taking 5.5 minutes with a 5/5 rating, stand out. Alternatively, the Grout-EEZ cleaner, despite its higher price, offers a robust solution for tough stains. Additionally, cleaning routines incorporating steam cleaners or frequently used DIY solutions such as baking soda, dish soap, and hydrogen peroxide prove effective for both deep and light, routine cleaning.
Effective grout cleaning techniques ensure longevity and cleanliness, making it imperative to choose methods that can maintain and enhance your kitchen’s pristine condition.
Understanding Different Types of Grout
Before beginning the cleaning process, it is important to understand the different grout varieties. Each type of grout has unique characteristics that impact both its application and maintenance. By knowing the differences, you can choose the right type for your kitchen and ensure a clean, long-lasting finish.
Sanded Grout
Sanded grout is known for its durability, making it an excellent choice for high-traffic areas such as kitchens. It contains large sand grains, which help bond the grout and prevent cracking. Sanded grout is typically used for wider grout lines of 1/8 inch or more. Its rough texture makes it less likely to shrink or pull away from tile edges, providing a longer-lasting finish.
Unsanded Grout
Unsanded grout is ideal for thinner grout lines between 1/16 and 1/8 inch. Its smoother texture prevents scratching delicate tile surfaces and is easier to work with when filling tighter spaces. This type of grout is often preferred for vertical applications, like backsplashes or walls, where sand particles could be disruptive. When comparing sanded versus unsanded grout, the latter is chosen for its gentle properties and ease of use in smaller seams.
Epoxy Grout
Epoxy grout stands out among grout varieties for its resistance to stains and minimal maintenance requirements. Made from epoxy resins, silica fillers, pigments, and a hardener, epoxy grout is less porous than cementitious grouts and is particularly effective in kitchens prone to grease and acids. The epoxy grout advantages include its waterproof nature and suitability for wider seams, making it ideal for areas exposed to significant use and moisture.
Choosing the Right Cleaning Tools
Choosing the correct grout cleaning tools can greatly enhance your efficiency and effectiveness in maintaining clean grout lines. Investing in the right tools will not only save time but also ensure superior results.
Grout Brushes
Grout brushes are essential for scrubbing grout effectively. Brushes with stiff bristles are designed to clean without damaging the grout or tiles. One of the best options available is the Full Circle Grout Brush, priced at $11 on Amazon. For a complete brush set, the OXO Grout Brush Set can be a perfect choice, available at $9 on Amazon, Macy’s, and The Container Store.

Steam Cleaners
Utilizing steam cleaner benefits your cleaning routine by offering a chemical-free, eco-friendly solution. An example is the Bissell SteamShot, which uses pressurized steam to clean and sanitize grout efficiently. Not only does it tackle dirt and grime, but it also helps in maintaining the cleanliness of your tiles over time.
Grout Pens
Grout pens are particularly useful for touch-ups after cleaning. While they do not clean grout, grout pen uses include hiding persistent stains that cleaning tools cannot remove. These pens can temporarily restore the appearance of your grout, making it look fresh and new.
Among the popular grout cleaners, Better Life offers the best overall tile and grout cleaner for $16 on Amazon, $7 at Walmart, and Thrive Market. For those looking for eco-friendly options, Goo Gone’s cleaner is priced at $14 on Amazon and $12 on Ace Hardware, proving to be a reliable choice. Each of these products complements your grout cleaning tools and enhances their effectiveness.
Using Household Items to Clean Grout
Cleaning your kitchen grout doesn’t always require commercial products. There are numerous household items that can make DIY grout cleaning both effective and safe. A popular and kitchen-safe cleaning option involves a simple mixture of baking soda and water. For regular grime, mixing two parts baking soda with one part water can work wonders. If you’re tackling more stubborn stains, combine two parts baking soda with one part vinegar for enhanced cleaning power.
Another natural grout cleaning solution is a paste made from 3/4-cup baking soda, 1/4-cup hydrogen peroxide, and 1 tablespoon of mild dish soap. This mixture not only lifts dirt efficiently but also handles bacteria, offering a comprehensive cleaning approach. Using this paste ensures you are employing natural grout cleaning solutions without any harsh chemicals that could potentially harm your kitchen surfaces.
Vinegar, a staple in many households, is known for its cleaning prowess. When mixed with warm water, it can provide a simple yet effective cleaning mix for your grout. If additional abrasive action is necessary, adding baking soda to the vinegar solution can help to lift grime and stains. This combination retains its kitchen-safe cleaning profile, making it ideal for areas where food preparation occurs.
For deeper cleaning tasks and heavy stains, oxygenated bleach mixed with warm water is highly effective. A strong bleach solution, consisting of 3/4 cup bleach to 1 gallon of water, can be used for lighter stains, but remember that acidic cleaners are generally not recommended for grout, as they can cause damage over time.
Using household items for grout cleaning is not only a cost-effective solution but also a safe alternative for maintaining the cleanliness and appearance of your kitchen area. For more detailed instructions on how to utilize these everyday items for grout cleaning, check out this comprehensive guide from Squeaky Cleaner Homes or visit Family Handyman.
Steps for Cleaning Kitchen Grout
Maintaining the pristine condition of your kitchen grout involves a straightforward grout cleaning process. Here’s a step-by-step guide to help you achieve effective grout maintenance and ensure your kitchen grout treatment yields the best results.
Initial Surface Cleaning
Before diving into deep cleaning, begin by removing any surface debris. Use a broom or a vacuum to sweep away loose dirt and crumbs from the grout lines. This initial surface cleaning step is crucial because it prevents these particles from interfering with your cleaning solution’s effectiveness.
Applying Cleaning Solution
The next step in your grout cleaning process is applying an appropriate cleaning solution. You can choose between a commercial grout cleaner like Zep Grout Cleaner & Brightener or a homemade mixture of baking soda, hydrogen peroxide, and a bit of dish soap. Spread the solution over the grout lines evenly and let it sit for several minutes, allowing it to penetrate and loosen embedded dirt. For commercial solutions, follow the manufacturer’s guidelines on dwell time.
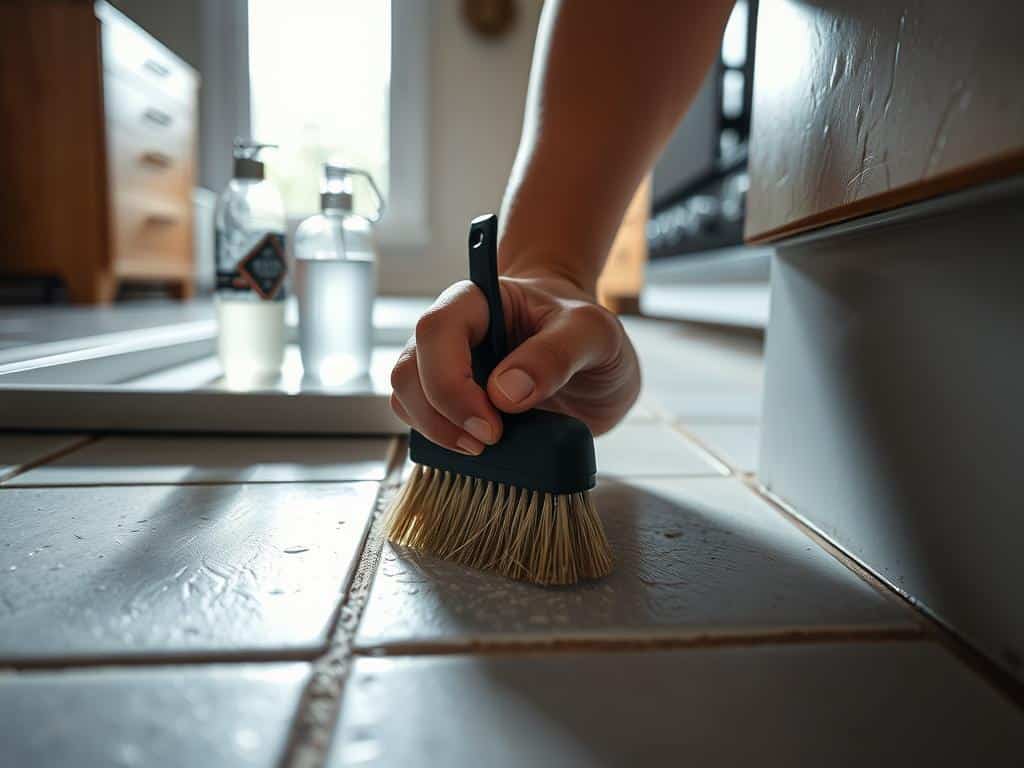
Scrubbing and Rinsing
After the cleaning solution has had time to work, it’s time to scrub the grout lines. Use a grout brush or a Rubbermaid spin scrubber to work the solution into the grout. Pay attention to stubborn areas that might need extra elbow grease. Once you’ve thoroughly scrubbed the grout, rinse the area with clean water to remove any remaining cleaner and dirt. Dry the grout with a cloth to prevent new dirt from sticking to damp surfaces.
Effective grout maintenance involves consistent care and attention to detail. By following these steps regularly, you can keep your kitchen grout looking fresh and prevent the buildup of grime. Whether you opt for commercial products or a DIY approach, regular maintenance is key to maintaining clean and pristine grout lines.